
Shopify Plus Performance Max: Brand Exclusions & Bidding
By:
Stop wasting ad spend on low-margin sales. Pass real profit data to scale net returns using advanced google ads shopify plus strategies.
To scale Google Ads for Shopify Plus successfully, merchants must move beyond default configurations that inflate ROAS through brand search cannibalization. We optimize Performance Max (PMax) and Smart Bidding by isolating branded queries, segmenting product feeds by margin profiles, and passing real-time net profit data instead of raw revenue. This technical approach ensures Google's machine learning algorithms optimize for actual bottom-line profitability rather than top-line volume.
Key Takeaways
- Isolate brand traffic using explicit brand lists to force PMax to target 100% incremental, non-branded search terms.
- Segment Shopify catalogs into margin-based custom labels (e.g., High, Medium, Low) to set distinct, profit-aligned tROAS targets.
- Pass dynamic net profit values (Revenue minus COGS and shipping) to Google Ads using Shopify Checkout Extensibility and Web Pixels.
- Configure Value-Based Bidding (VBB) to bid higher for net-new customer acquisitions based on 12-month Customer Lifetime Value (LTV).
Step 1: Implementing Brand Exclusions in Shopify Plus PMax Campaigns
Integrating google ads shopify plus campaigns successfully requires active brand exclusions to prevent Performance Max campaigns from bidding on your own branded search terms. By applying a brand list to your PMax campaign, you force Google's algorithm to target incremental, non-branded queries, protecting your organic search margins and revealing true acquisition performance.
Performance Max (PMax) is a goal-based campaign type that allows performance advertisers to access all of their Google Ads inventory from a single campaign. However, without strict guardrails, it defaults to low-hanging branded search traffic.
- Navigate to Tools and Settings > Shared Library > Brand lists in your Google Ads dashboard.
- Click the plus button, name your brand list, and select your official brand name from the Google database.
- Go to your specific PMax campaign, click Settings > Additional Settings > Brand exclusions, and apply your list. Detailed instructions can be found in the official Google Ads Brand Lists documentation.
Common Mistakes with Brand Negatives
- Assuming account-level negative keywords automatically apply to PMax without manual brand list assignment.
- Failing to monitor the Insights tab to verify that branded search terms have dropped to 0%.
How to Fix
- If your brand name is missing from Google's database, submit a brand creation request directly within the brand list UI, or contact Google support to force the negative keyword mapping at the campaign level.
Step 2: Structuring PMax Asset Groups by Shopify Product Margin Profiles
Standard product feeds treat all SKUs equally, forcing Google's Smart Bidding to optimize for top-line revenue instead of gross profit. To scale profitably, we segment campaigns by custom labels based on product margin profiles.
- Export your Shopify catalog and segment your SKUs into three tiers: High Margin (60%+), Medium Margin (40-60%), and Low Margin (<40%).
- Map these margin tiers to Custom Label 0 in your Google Merchant Center feed rules or via your feed management app.
- Build separate PMax campaigns or asset groups filtering strictly by your Custom Label 0 values.
- Assign distinct targets: set an aggressive tROAS (e.g., 150%) for high-margin items to maximize volume, and a conservative tROAS (e.g., 350%) for low-margin items to protect your bottom line.
- For complex product catalogs that require dynamic feed manipulation, leverage specialized Shopify custom development services to automate feed attributes.
Step 3: Passing Shopify Plus Custom Conversion Values to Smart Bidding
Default conversion tracking passes raw revenue, which misleads Google's bidding algorithm if your COGS varies across SKUs. Feeding net profit values into Google Ads enables true profit-driven bidding.
- Configure your Shopify store to calculate net profit (Revenue minus COGS and shipping cost) per order.
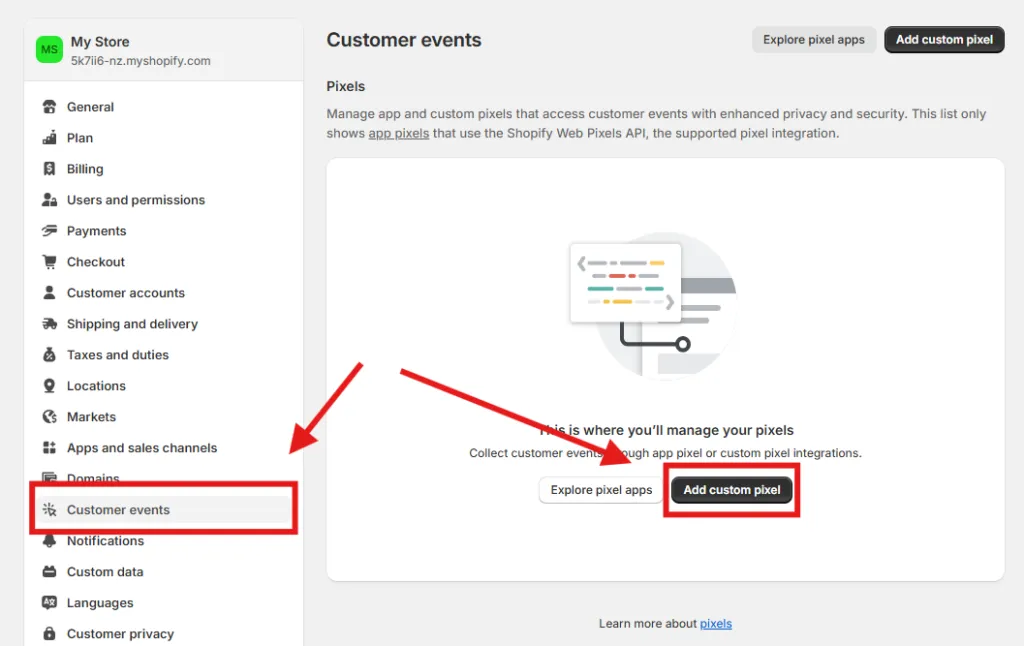
- Inject a custom script into the Shopify checkout page (or via Shopify Pixels) to calculate this dynamic profit value.
- Map this calculated net profit to the
valueparameter in your Google Ads conversion tracking tag. - Modify your Google Ads conversion action settings to use "Different values for each conversion".
- Verify the data transmission in Google Ads under Diagnostics to confirm the monetary value matches your net profit, not raw revenue.
To ensure your backend data warehouse and tag manager align correctly without breaking checkout scripts, utilize professional technical SEO and data integration to audit the pipeline.
Step 4: Setting Up Value-Based Bidding (VBB) for New Customer Acquisition
To scale your 8-figure Shopify Plus store, we prioritize net-new customer acquisition over cheap, repeat-buyer conversions. Value-Based Bidding (VBB) is a smart bidding strategy that uses machine learning to maximize the total value of conversions rather than just the volume of conversions, allowing you to assign a higher value to new customers.
- Navigate to Tools and Settings > Measurement > Conversions.
- Click on Customer acquisition and select Set up.
- Define your New Customer Value. Calculate this by subtracting your repeat customer Average Order Value (AOV) from your 12-month Customer Lifetime Value (LTV).
- For example, if your LTV is $300 and AOV is $100, set the acquisition value to $200.
- Choose the New Customer Value mode (Bid higher for new customers than existing customers) to prevent the campaign from shutting off repeat buyers entirely while heavily favoring new acquisitions.
- Verify that your Shopify customer tags are synced via Google Customer Match lists to keep existing-customer audiences updated in real time.
Step 5: Auditing Google Ads Conversion Tracking with Shopify Checkout Extensibility
Shopify's deprecation of legacy checkout scripts requires all Plus merchants to migrate to Checkout Extensibility. If your tracking is not migrated, you will lose critical conversion data, degrading your Smart Bidding accuracy. Review the official Shopify Checkout Extensibility documentation to understand the migration path.
What to Avoid
- Relying on deprecated
checkout.liquidscripts for Google Tag Manager (GTM) deployment. - Double-counting conversions by running both the native Shopify-Google channel app and custom GTM web pixels simultaneously.
- Failing to pass the unique
transaction_id, leading to conversion deduplication issues.
How to Fix
- Deploy a custom Shopify Web Pixel via the Customer Privacy API to handle the Google tag or GTM container safely.
- Ensure the web pixel subscribes to the
checkout_completedevent. - Map the Google Ads conversion ID, conversion label, value, currency, and transaction ID within the sandbox execution environment.
- Test the implementation using the Shopify store preview and the Google Tag Assistant to confirm a 100% match rate on transaction IDs.
How Avelize Approaches This
Our team implements this advanced tracking and bidding architecture through a structured 4-week program:
- Week 1: Audit & Feed Restructuring (KPI: Clean product margin mapping via Custom Labels)
- Week 2: Checkout Extensibility Migration (KPI: 100% transaction ID match rate via Shopify Web Pixels)
- Week 3: Profit Data Integration (KPI: Real-time COGS and net profit transmission to Google Ads)
- Week 4: Smart Bidding & VBB Launch (KPI: Non-branded incremental conversion volume growth)
This program is delivered as part of our technical SEO and data integration services starting at $5,000.
Frequently Asked Questions
Is PMax worth it for Shopify Plus stores?
Yes, Performance Max is highly effective for Shopify Plus stores, provided you implement strict brand exclusions and margin-based asset group segmentation. Without these guardrails, the algorithm tends to prioritize low-margin products and brand search cannibalization to inflate its reported ROAS.
How do you exclude brand keywords from Shopify PMax campaigns?
To exclude brand keywords, you must build a brand list in the Google Ads Shared Library and apply it as a brand exclusion under the additional settings of your specific Performance Max campaign. This forces the algorithm to focus exclusively on incremental, non-branded acquisition.
What is the difference between raw revenue bidding and profit-based bidding on Shopify Plus?
Profit-based bidding on Shopify Plus differs fundamentally from raw revenue bidding by instructing Google's Smart Bidding algorithms to optimize for actual net margin rather than top-line sales volume. Under a standard raw revenue setup, Google Ads treats a $100 sale with a 10% profit margin identically to a $100 sale with a 70% profit margin, often leading the algorithm to favor high-turnover, low-margin SKUs that drain advertising budget. By calculating net profit in real time—subtracting Cost of Goods Sold (COGS), shipping fees, and transaction costs—and passing this dynamic value through Shopify Checkout Extensibility Web Pixels to Google Ads, merchants align machine learning directly with bottom-line business health. This shift allows Performance Max campaigns to aggressively bid on high-margin acquisitions while automatically scaling back on low-margin products, ultimately maximizing actual cash flow rather than vanity ROAS metrics.
Ready to maximize your store's profitability? Partner with our team for a dedicated technical SEO and data integration program to align your smart bidding with real net margins.
Published / Last reviewed: 2026
Related Shopify and Ecommerce Growth Guides
Continue with these related guides for implementation, SEO, performance, and conversion context.
- Meta Ads for Shopify Plus: Advanced Scaling Strategy
Related Avelize Services and Guides: Shopify Speed Optimization Services · Technical Audits · Brand Identity